Making A Hair Ring from start to finish using UV resin like ours here and one of our custom ring kits. You can use any rubover ring setting, such as these from ZDP on Etsy, or you could fill a bezel setting like this with resin but please see our blog on Filling V’s Rubover settings to find out why we recommend you use a mould!
This vlog is similar to our Making A Cremation Ashes Ring Vlog but I’ll be showing you how to set the hair in an 8mm cabochon. If you’re making a charm bead or a sphere setting then watch our making a hair charm bead tutorial here.
You can read more about working with hair in our How To Make Lock Of Hair Jewellery blog here (click). Remember: every customer’s hair or fur will come a different colour or texture. Let them know before accepting an order that the results will vary and some hair isn’t going to be visible. White and light blonde hair/fur is notorious for going clear, “white” hair is often translucent rather than truly white and is a huge reason for complaints. Include this in your terms and conditions (even if they don’t bother to read them, you’re covered) and make sure to send proof photos.
Making A Lock of Hair Ring
You’ll need the following supplies:
one of our ring settings kits in your client’s size (the kits contain a ring setting, a single 8mm round cabochon mould, label backing paper, 25g UV resin, 3 cocktail sticks and a random sample of resin sparkle mix, vinyl gloves, a dust mask and some sandpaper)
You might also need:
your client’s lock of hair or fur
hairdressing scissors
silver polishing cloth
a ring sizing mandrel
a ring clamp (cruelty-free ones coming soon)
a diamond file (coming soon)
a burnishing tool (coming soon)
I like to use an LED UV lamp to save energy and make sure the pieces don’t get too hot. This one has a 99 second low heat setting
Please note we have specific supplies lists for the UK, USA, Australia and Canada (more countries coming soon). Some of the supplies in this Making a hair ring blog are optional, such as the diamond file and ring clamp.
PREPARING THE MOULD
As usual, inspect the mould any dust, dirt, lines and imperfections
Don’t forget to replace your moulds regularly to prevent your pieces being dull
You could make this ring without a mould, but please see our Filled V’s Rubover Cabochon Setting blog before deciding
PREPARING THE HAIR
Double check your client’s name and order number against what they’ve ordered
Inspect the hair and decide how much you want to use and how you want to lay it out
Carefully put a very small line of resin along a piece of label backing paper, this is to hold the hair in place and stop it blowing away
This is essential if you’re working with a teeny tiny lock of hair, such as from a baby
Cut the lock a little longer than you’ll need and place it on the resin
I recommend you buy a double mould and make two at once to give your client the choice, so use double the length of hair
Coat the hair in resin and use a cocktail stick to make sure it’s well-soaked and remove any bubbles
PLACING HAIR IN THE MOULD
Cut the hair to the length needed
You need each length of resin-soaked hair to be around a third longer than the width of your mould
For an 8mm mould, you could cut the hair around 11mm wide

If your client sent plenty of hair, you could cut some slightly different length sections and use trial and error to find your ideal length
Each lock of hair and fur will act differently in the resin, cat fur is (in my opinion) the most difficult to work with
Use the cocktail stick to carefully nudge the hair on top of the empty mould
Push the hair down so it sits how you want and be careful not to poke your mould at this stage
Nudge out any air bubbles, which will look like silvery dots or lines
Translucent moulds are vital here because you can check the placement from underneath!
You can place it under your UV lamp for 30 seconds at this stage to set the hair in place
I prefer not to, because sometimes the colour can get underneath the cured hair if you do
COLOUR LAYERS
Check you have the right colours then work in thin layers to build up colour gradually until the cabochon is opaque
That means you need to make sure you can no longer see any light through it from the back
Another good reason to use water-clear moulds!
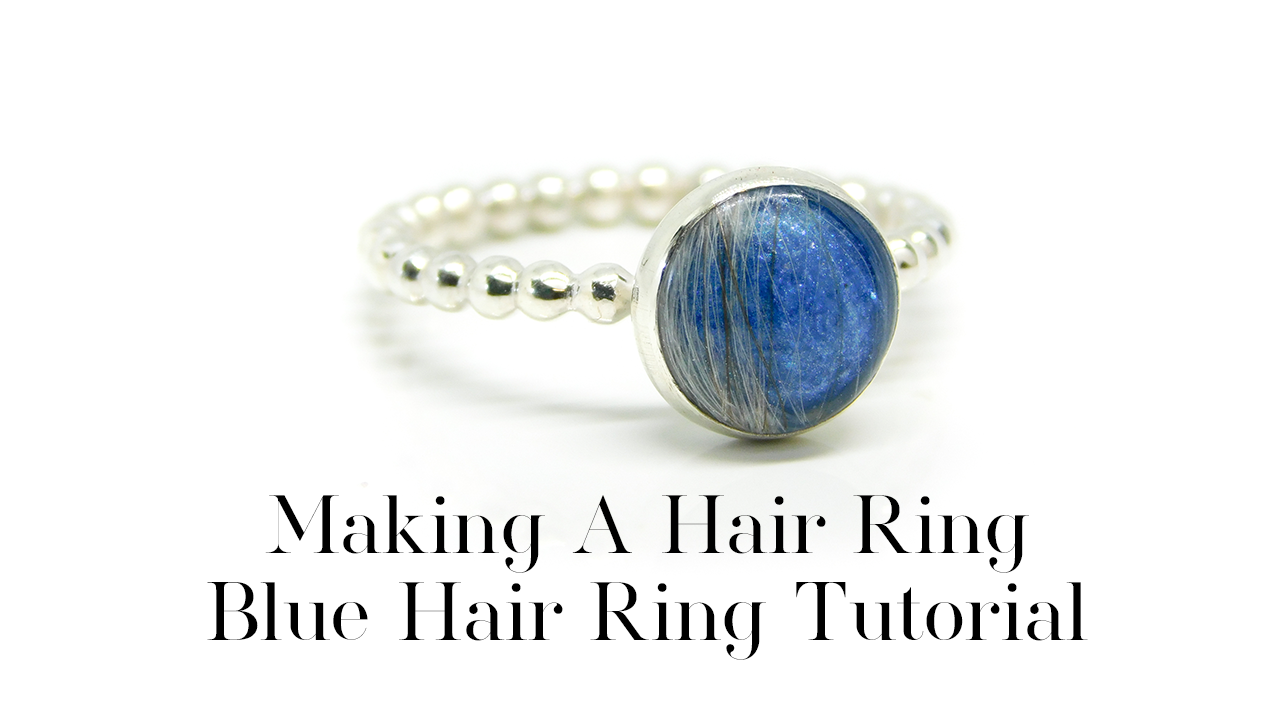
Today I’m using the Aegean blue resin sparkle mix blend exclusive to Keepsaker Supplies
For a more detailed tutorial on working in layers see my cremation ashes ring video
After you’ve fully cured the cabochons at the end, remove from the UV lamp and leave to cool completely
Remove the cabochons from the mould, trying not to touch the shiny top
Cure for a final 99 seconds and leave to completely cool again
PROOF PHOTO
Use the cooling time to clear up your workstation, put your client’s hair back into their bag and wash your work area
I like to send my client a proof photo of the cabochons to make sure they’re happy with the colour and choose their favourite stone
Please make sure you make it clear to them you will always return the unused cabochon to them free of charge!
It can be heartbreaking for a client to think you’d dispose of their loved one’s hair or ashes, and with hair I even try to cure and return the extra from the label backing paper
SETTING
Check and prepare the cabochon
If it’s still sticky you may not have cured or cooled for long enough, if so, give it a thin coat of clear resin on the top and cure and cool completely
PREPARING THE SETTING
You can use a ring sizing mandrel to check that your ring setting is the correct size
If you like, give it all a quick polish with a silver polishing cloth
Clamp it in a ring mandrel if you have one, and place the stone inside and check it sits nicely
SETTING THE STONE
Use a curved burnishing tool to very gently push down the silver around the edges
Work around as if it’s a clock, 12 o’clock, 6 o’clock, 3 o’clock, 9 o’clock
Don’t push too hard or you could end up with ridges in the silver
Once it’s all pushed down you can start to apply a little force
Make a tight seal by rubbing the silver over. That’s why it’s called a rubover setting

Making a Hair Ring
Now you have finished Making A Hair Ring to send to your client you can photograph it as usual. Please subscribe to my YouTube channel and hit the notifications bell because my next series of videos will be breastmilk jewellery tutorials. I’ll be using Milky Mama Magic Dust™ from my friend Amy “The Breastmilk Queen”. I’m also going to be doing some videos with do’s and don’ts for those of you who want to investigate your own breastmilk preservation methods.
Now relax and do some crafting
Please note, this Making a hair ring blog contains affiliate links meaning I receive a small income based on your purchases from Amazon and Etsy etc. This affiliate income is really helpful to me to support my family and if you’d like to know how I set it all up please get in touch (blogs coming soon!)
Nikki x

[…] Making A Hair Ring […]