How To Make Lock of Hair Jewellery
Jewellery made with hair is one of the first types of keepsake pieces I started to make. It was a bit of a challenge and there was nothing I could find online. I could see what other people had done but in my head there were things I wanted to do. The first pieces I made were charms with my children’s hair and I used trial and error to teach myself.
You can see my blog and video for making a lock of hair charm bead here! There are supplies lists for the UK here, USA, Australia, Canada, other EU countries (coming soon) and non-EU countries (coming soon).
If you’re making a lot of resin jewellery in big batches then it’s cost-effective to use epoxy resin. Lots of people ask me what brand to buy but I always found the unbranded rigid casting epoxy like this one to be best. Sadly EcoResin is a no-go and I nearly lost my business due to dozens of pieces going yellow. Usually you get epoxy resin in two bottles, part A and part B, which you have to mix perfectly in exact ratios and can take several days to cure. It would be perfect for doing big batches of flower jewellery, such as rose bud pearls.
We mostly use UV resin like the our UV resin here, you can also use the Lisa Pavelka brand but it’s more expensive and you can’t get the big bottles. My trick is to buy a 60g bottle and a 200g bottle to refill it with. The little bottles are great to pour directly in your moulds. You’ll also need a cheap gel lamp like this. My hack for the gel lamp is to remove the plastic insert and place the lamp on a sheet of aluminum foil! We want the maximum amount of light to hit the jewellery to cure the resin and you work in layers.
With UV resin it’s easier to keep the resin from getting too thick (which happens with epoxy during its pot life). So long as you keep it away from the gel lamp and the sunshine it will stay liquid and thin enough to work. If your resin is too thick it gets sticky and the hair won’t move around. To prepare a lock of hair piece I get together what I need so it’s all within reach and make sure I’ve got my protective things on.


Safety Making Lock of Hair Jewellery
1. Make sure you’re not working around kids and pets. Even if a resin has low fume it can still cause a reaction. I’ve heard of people not only having reactions from contact with resin (like me) but having trouble breathing. Even for yourself, you need to take care.
2. Wear proper PPE (personal protective equipment).
I like to wear a thick coating of a barrier spray like the 3M Cavilon or No More Gloves. Then I know if I’m struggling and have to take off my gloves, my skin’s got some protection. I tried Metanium but it made my work marked and I managed to get some on my silverwork which gave it a nasty coating of dull titanium! Then I double up on nitrile gloves and pop on a face mask.
Resin Lock of Hair Jewellery
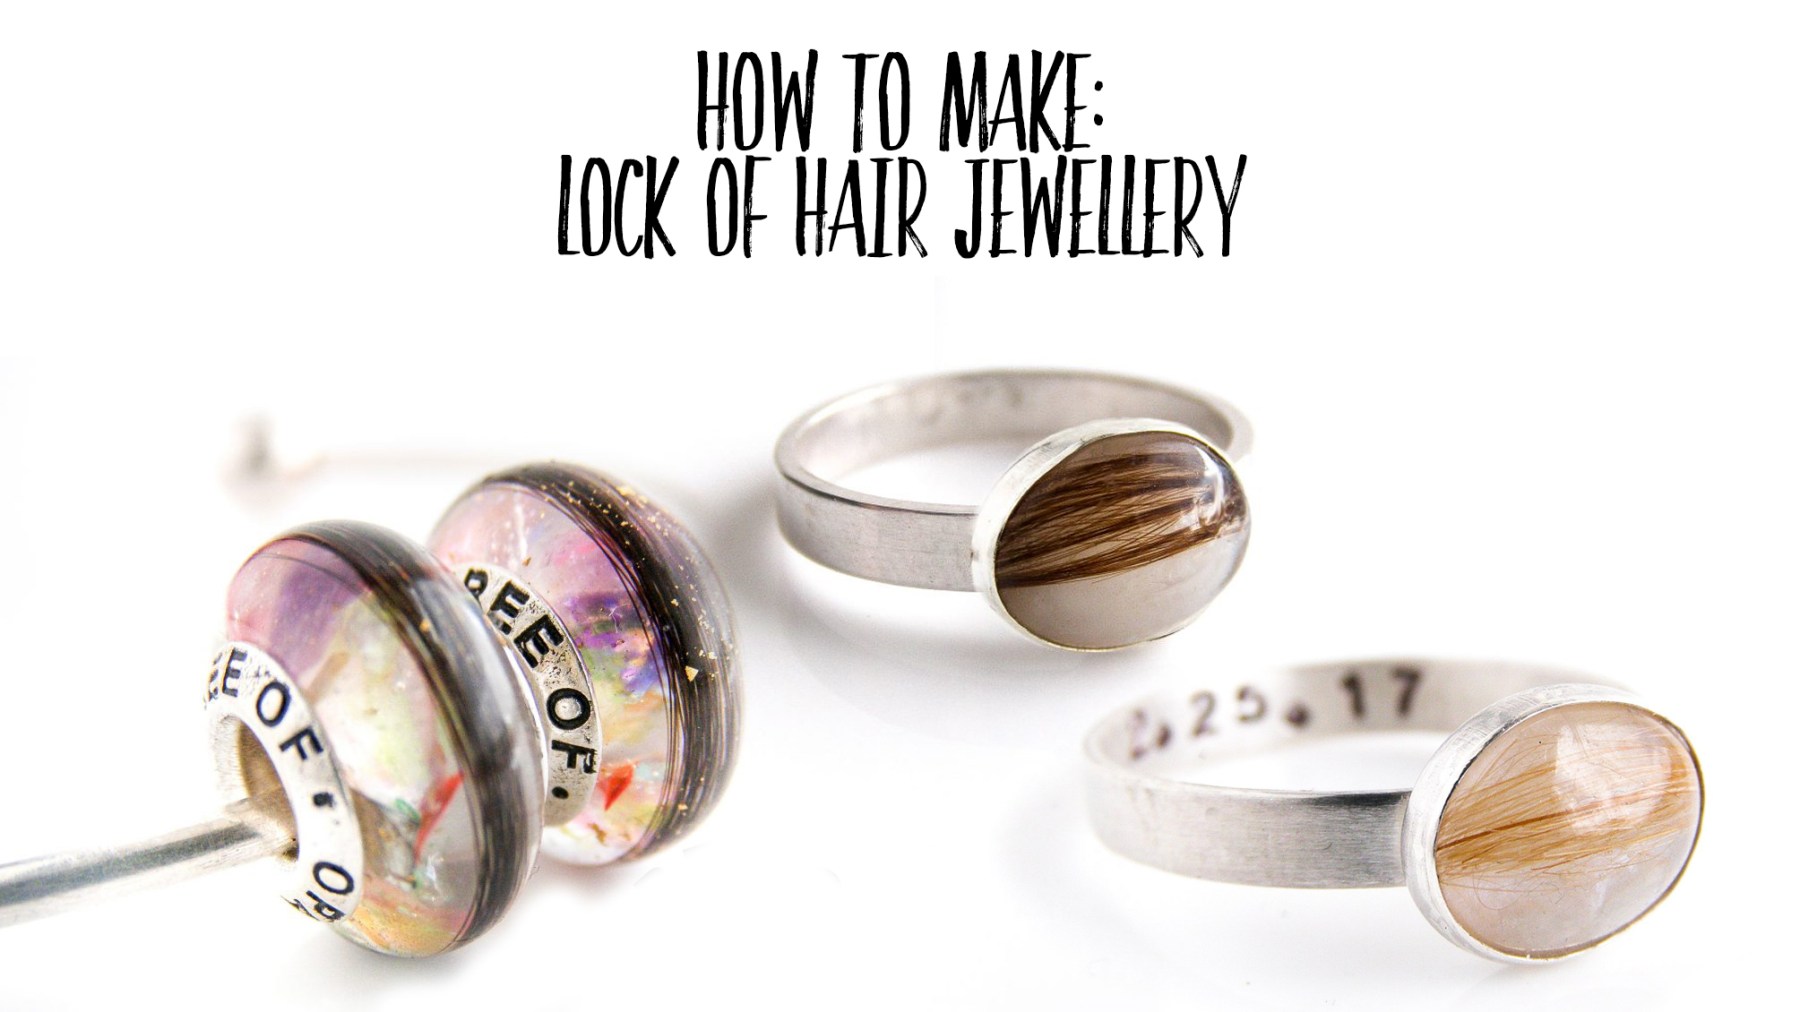
Our best selling items are our charm beads. They take a bit of practice and a special mould and knowledge of filing, doming and attaching hardware called inserts, also known as grommets and washers. Pearls are popular, they are spheres made with 10mm moulds but can be bigger or smaller, and need to be drilled and attached to pearl cups. Rings are a little less complicated because you can pour the resin into a ring cup, or make a cabochon (a “stone” with clients’ elements) and fit it into a ring with crown settings. I’ll write more blogs soon on settings and explain the differences between the three main style of setting resin rings, how to drill charm beads and pearls.
To prepare the hair, take an even lock and place it on some shiny paper, like the type labels come on. Pour a little resin on top and make sure it’s soaked in. Sometimes we cut the paper to make each end of the hair even. Then use a toothpick to pick up the hair and place it round the edge of the mould. Make sure there’s enough resin on it or you’ll get microbubbles that leave lines around the edge of the finished piece. I recommend using a water clear mould, or at least translucent

If you’re using UV resin, cure this as your first layer then fill the mould with more resin and any colours and additions. Sometimes we leave the resin completely clear and when the piece is cured we add a coloured core or background. You can add colour and shimmer, glitter, precious metal leaf, mica and even natural colourants like beetroot powder (although these tend to fade quickly in the sun). You will find your own style and clients will choose you because they like your work.
Other Media to Make Lock of Hair Jewellery With
You can fill little glass bottles like these with a lock of hair and dried petals and opalescent flakes, sealed with jewellery glue. You then screw in an eyelet.

cremation ash jewellery part 1 here and part 2 here
how to make breastmilk jewellery part 1 is here, part 2 is here and part 3 is here
I have more tutorials and blogs planned for the future including umbilical cord and placenta jewellery, how to make *trigger* baby loss keepsakes, metal clay jewellery and silversmithing. Also some blogs on being clean, parenthood, veganism, charity work, travelling and various other interests. Most of my blogs are written in notes on my phone when I don’t have internet access (the school gates, the car) or when I’m nursing our son Bastian and I love the chance to share my creativity even more.
For classes on resin you may be able to find something local but I learnt all resin and most silversmithing from YouTube tutorials. We’re planning videos showing you how to make and use silicone moulds, open bezels and pour-in bezels as well as some studio safety. You can read about Fairtrade Gemstone Ethics here; if you’re adding precious stones to your work and Nikki is soon to be visiting a friend’s gemstone mine in Tanzania at the same time as delivering menstrual pads with their charity Project Kidogo.
Spellings – this blog is written in the United Kingdom so my spelling is in English. I’ll try to add alternatives after but our spelling of jewellery is correct here. Mould (UK) mold (US).
This post contains affiliate links that should work in the USA, Canada and the UK, meaning when if you buy one of our recommended products I receive a small amount of earnings at no extra cost to yourself.


[…] post has now permanently moved to our sister site Keepsaker Supplies; we hope you enjoy […]
[…] This video will show you how to make this resin lock of hair charm bead from start to finish. We’re adding rose petals for their sentimentality. You can read more about working with hair in our lock of hair jewellery making blog here (click). […]
[…] How To Make Lock of Hair Jewellery […]
[…] How To Make Lock of Hair Jewellery […]
[…] How To Make Lock of Hair Jewellery […]
[…] How To Make Lock of Hair Jewellery […]
[…] How To Make Lock of Hair Jewellery […]