Fitting a Bead Core for charm bracelets – our bead cores fit perfectly on Pandora bracelet* and will probably be your biggest seller. You’ll need one of our one of our bead cores here or one of our charm bead DIY kits here and a small lightweight hammer to make this charm bead.
Our bead cores are compatible with the medium, medium plus, faceted and honeycomb moulds. You can use them with our large bead moulds but you won’t be able to flare the back using the method below – you can glue them in though (thanks Mikayla at Stuffed With Love for this tip, I hadn’t thought of trying it!) Sorry, but our bead cores aren’t compatible with the slim or super slim moulds unless you’re able to file part A of the core down. For those beads, we’d recommend using our nice wide heart-stamped glue-in inserts here.
Fitting a Bead Core
You’ll need the following supplies
- a resin bead (bead mould, UV resin or epoxy resin, side cutting pliers, rotary tool, cabide burr bit)
or
- glass lampwork bead, semi precious stone or polymer clay bead with a core around 7 or 8mm in length
- Forever In My Heart ♥ core
- 6mm ball bearing – there’s one included free with every core order!
- lightweight hammer like this one
or - a doming punch set
This video shows you the process of fitting a bead core when on a charm bead with a very tiny amount of white hair and unicorn white sparkle mix. Please subscribe and get notifications to hear about our latest videos first, and I’ll post a tutorial on making a charm like this soon.
PREPARING THE CHARM BEAD
If you’re working with resin then completely cure and cool your charm bead, and check it for imperfections and air bubbles
You might be able to repair some small air bubble but it’s usually easier to make a fresh one especially if you’re working with UV resin
Make sure your client is happy with the bead you’ve made by sending them a proof photo
Carefully use side cutting pliers to remove the excess resin
Use your carbide burr bit in a rotary tool like this to remove the rest of the resin
You can buy a Dremel brand rotary tool or invest in a really good quality pendant motor that comes with a foot pedal and different heads
Clean the bead with a little rubbing alcohol to remove the dust
For lampwork glass beads, make sure your bead is completely annealed and cooled
Use a bead reamer to clean inside the charm bead and completely remove the bead release
FITTING THE CORE
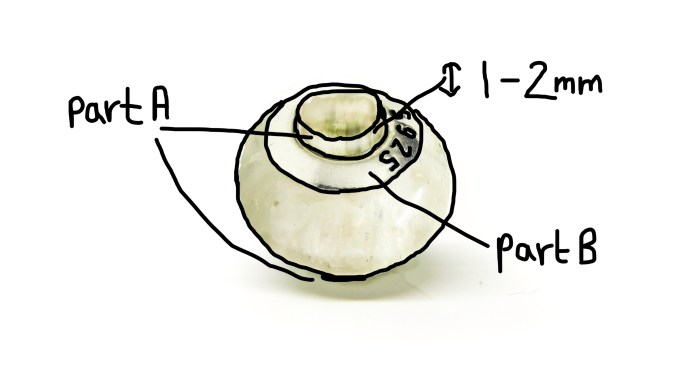
Check the core fits nicely in your bead and covers any sanding area
I prefer to put part A (the mushroom shaped bit) through the front of the bead, what was at the bottom of the mould
That means that if any ashes or flakes have sunk in the resin during the curing process, they’ll be at the front of the charm bead
Push part B onto the back
It will be more than enough to cover the sanding area if you’re using one of our moulds
However, if you’ve cracked the area when removing the resin or slipped with the rotary tool you can cover it with a little bit of resin before adding part B
FLARING A BEAD CORE
Put your bead on a cloth with part A face down
Part A should be slightly proud of the surface or just level with part B
If it’s too short, you won’t be able to flare it to secure it over part B, in that case just drill off a little more resin from around the pouring spout
If it’s much too long, check you’re not using a mould that’s too thin such as the slim or super slim mould
Your bead needs to be around 7 or 8mm in height for the cores to fit nicely
If you’re working withe the ball bearing, place this over the top of part A and really gently hit it with a hammer
Don’t hit it too hard or try using a coring press or you’ll warp the core (a sad and expensive mistake I’ve made too many times to count)
Check that it’s secured and doesn’t twist by trying to get a fingernail or something flat underneath it
If it’s loose or you can still pull part B off, hit the ball bearing again to secure the core
You will find it easier to fit cores if you use a doming punch. I like to use a 5mm punch and gently press it down from above
Widen the core gradually by increasing the size of the punch and you will get perfectly even results
I like to use a 5mm and an 8mm punch and the set cost me about £15 pound sterling, you can find the link below to buy a set
Now you have finished Fitting a Bead Core and you can send your bead to your client. Please subscribe to my YouTube channel and hit the notifications bell because my next video will show you how to preserve breastmilk using Milky Mama Magic Dust™ from my friend Amy “The Breastmilk Queen”. I’m also going to be doing some videos with do’s and don’ts for those of you who want to investigate your own breastmilk preservation methods. My own baby is coming in a few weeks so I’ll be putting a hold on orders for a short while but back up and running as soon as I can.
If you’re a customer of mine at Keepsaker Supplies, you can join our Facebook group, the Breastmilk and Memorial Jewellery Group here.
Now relax and do some crafting

*Fitting a Bead Core “for Pandora Bracelets”
*This blog and video tutorial are not called “Bead Cores for Pandora Bracelets” because they are not made by Pandora! We have never sold our pieces as “for Pandora”, through either Tree of Opals (where we’ve sold charm beads for over five years) or here on Keepsaker Supplies, and I highly recommend you do the same! Although it’s tempting to do so, as customers certainly do search for “hair Pandora bead” on a regular basis, it can potentially lead to a cease and desist from the company or even legal action. Plus, it’s not a very nice thing to do morally as the company have worked hard for decades to build the level of fame and customer loyalty. We’ll be covering how to do SEO and improve your Google rankings for breastmilk jewellery search terms soon, but try to resist offering anything to do with “Pandora beads with hair” especially in product titles.
A good way of showing that they fit after fitting a bead core, is ask your own customers to post pics themselves and give you permission to share. This review from the_muddy_mummy on Instagram shows how much people treasure these charms and you can embed posts just like I’m doing here pretty easily on your own website. You don’t technically need permission to embed but I always do as it’s polite
Please note, this Fitting a Bead Core blog contains affiliate links meaning I receive a small income based on your purchases from Amazon and Etsy etc. This affiliate income is really helpful to me to support my family, especially when I can’t ship orders with my new baby, and if you’d like to know how I set it all up please get in touch (blogs coming soon!). You can even be an affiliate for this website, just visit the affiliate page here to earn 10% of orders you referred here!
Nikki x
