Ashes Beach Scene Tutorial – medium difficulty project making bereavement and cremation jewellery using a direct pour technique. This technique is ideal for a heart setting (here) which are all solid silver or any direct pour setting. We also have some similar tutorials direct pour hearts in Fur and Ash Heart Necklace Tutorial
Ashes Beach Scene Tutorial Video

You’ll need the following supplies
one of our DIY ashes ring kits
the ashes/hair version of the kits contain:
- a heart setting (here)– this is the 16mm large size
- a practice setting for direct pour (checking colour etc)
- vinyl gloves
- resin sparkle mix set (you can use eyeshadow for custom colours!)
- a dust mask
- label backing paper
- some sandpaper
- 3 cocktail sticks
- 10g UV resin
You’ll also need your client’s cremation ashes for this Ashes Beach Scene Tutorial. We ask them to only send half a teaspoonful! That way, if it’s lost in the post they can send a little more. We sell wholesale sending kit supplies such as ashes sending pots here. You might also need:
-
- LED UV torch** or a good UV lamp for professionals
- individual resin sparkle mix in aegean blue, mermaid teal, angelic aqua and unicorn white
- diamond file
- 200g bottle of Padico Star Drop
- biodegradable cleaning wipes cut into smaller squares
- magic silver polishing stick
- silver polishing cloth
- Padico Star Drop Gloss UV Top Coat
- necklace chain
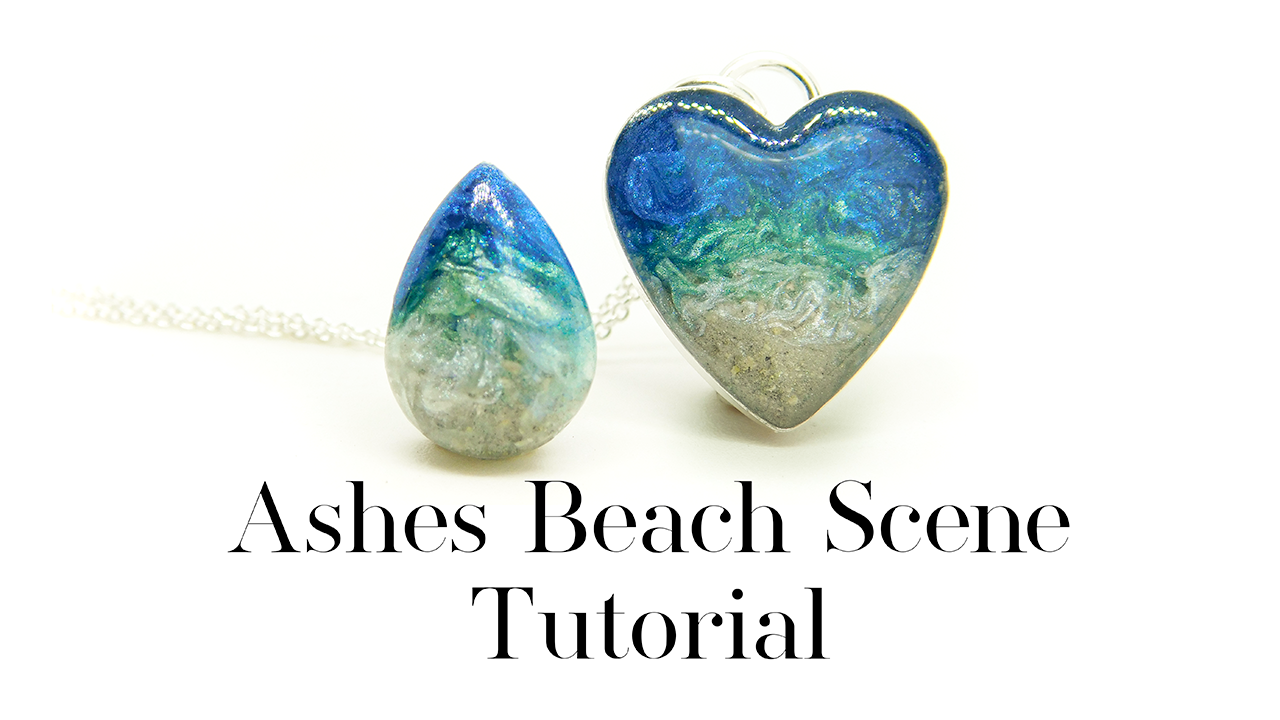
Ashes Beach Scene Tutorial
Hi, I’m Nikki Lovegrove and today I’m showing you how to make an Ashes Beach Scene necklace using UV resin. This heart is engraved with baby’s scan photo. Put the heart on something you can hold, I use an upside down ramekin with a little bit of white tack.
One of the downsides of pouring resin directly into a setting is that it’s prone to falling out. There are loads of ways to prevent this. I’ll list them in the blog on KeepsakerSupplies.com which you can find in the video description. First you’re going to scratch the inside of the bezel to create a “key”. I go three different directions then round in circles. Don’t press too hard or you can push dents into the silver that show on the back.
Cover the setting in a very thin layer of clear Padico Star Drop UV resin. This is a medium difficulty tutorial so if you’re new here please check out some of my easy and basic videos. You’ll see that I started using Padico a few years ago because it’s the most resistant resin to yellowing. You don’t have to have perfect coverage but the clear resin sticks better to the silver than coloured resin does. Cure for 60 seconds.
Next you can prepare your colour palette. I like to use a bit of tin foil to put a blob of Aegean Blue, Mermaid Teal and Angelic Aqua resin sparkle mixes. I sell these in little black opaque pots already mixed with Padico Star Drop because it saves time mixing up the powders for each project. A little goes a very long way but **please** make sure your pots are never exposed to UV or they will cure! Keep the lids on unless you’re taking some out.
Add a drop of clear resin to the bezel and put blue at the top, then teal, then aqua, then a little dab of cremation ashes and swirl everything but be careful not to mix them too much. Work in thin layers so you can use vibrant colours without worrying they might not cure. Put this under the lamp for 60 seconds; full heat is fine because it’s so thin. I like to cover up my palette with a little pot, this is a mortar that was handy because baby’s ashes were beautifully fine and didn’t need to be ground further.
Sorry about the next layer, I didn’t quite manage to get it in the frame, but I just did the same as the previous layer but worked from the bottom up, ashes first, which you can pre-mix with a little resin. I wanted the ashes as sand a little bit more visible. These layers are almost like practice areas or underpainting, they add texture and depth to the necklace but they don’t need to be perfect! Cure again for 60 seconds. The third colour area is the same again then you cure for another 60 seconds.
Now the next layer I did, I decided to use a white resin ink to create the foam of the waves. It didn’t work out! You can see it’s pretty at first and I thought we might get some cells but you can see it quickly spreads into an oily matte layer so I removed it with a sparkle applicator and started that layer again. In the new fourth layer cover everything in clear resin and add a small amount of each colour and then add a few subtle dots of white where the waves meet the sandy shore. Do a very subtle swirl then add more ashes at the bottom if you like. They can be as subtle or prominent as you like. Cure it again.
Tidy up your workstation with biodegradable cleaning wipes. During the layering process you need to keep in mind the total depth of the bezel cup. I did a total of 8 layers in this piece and it’s about 4mm thick. I’d say each layer is just over half a mm thick. The last few layers are clear. You can do it all in one layer but it might get a bit warm. You’ll get the best results doing two or three coats of clear to dome. I’ve brought the first up to the edges but the top is slightly domed under, or concave. Cure it then pick it up and inspect the edges. It’s quite normal if you get a bit over the edges and sometimes you can pick it off with your fingernail or very carefully with a craft knife.
If there are any bits that won’t come off or scratches, use the green side of a magic polishing stick then the white. Don’t forget there’s a link to all the supplies in the description. You might need to click on “show more”. Do another layer to dome the piece and give a nice finish. Add a little more if needed and make sure it reaches all the edges but doesn’t pool over. Look out for any bubbles or bits of lint then give it a few minutes to rest before you cure to help any microbubbles to pop.
I’ve been teaching these techniques for over ten years and it doesn’t always go perfectly. I’m first and foremost a jeweller so my workshop is never going to be sterile. I do my best to keep the dust down and clean regularly but there was a little strand of fluff that wanted to join these beautiful colours. When this happens, don’t panic, just remove any imperfections with the magic polishing stick green side then do a new top coat. You can use the Padico Star Drop UV resin for this but if you do have it handy, then their Star Drop Gloss UV top coat is amazing at filling any little bits and flows easily. Spread it out, check it all again, give it a minute to rest then cure three times.
In the meantime, if you have excess colour left over and you want to make your client an additional piece then you can. To do this technique in a mould to create a cabochon stone, you’re basically working backwards. My first layer is mostly clear resin but I’m adding a little colour, especially at the edges, to make sure the stone isn’t see-through at the end. Give it a very slight swirl and cure. I’m using a 99 second low heat setting because I don’t want it to get too hot and this is a larger stone.
The second layer can be a little bit more full-on with the colour. I like to work downwards and back up and the colours blend into each other how they like. I try not to spend too long on the beach scenes searching for perfection because the colours will choose where they want to be and I love the organic look. You can experiment with shades but I like the blue-teal-aqua-white-ashes look. If you try out a seascape stormy or tropical sea please leave your Instagram below so we can all see, and I can even embed them in the blog if you’d like to share! Or you can watermark them and send them to me on our Instagram or TikTok.
At the end I took a photo to send to my client but I left the pocket stone as a surprise. I am so incredibly grateful to her for permission to share this tutorial anonymously. Thank you, as always, for watching. Now relax and do some crafting

TikTok Ashes Beach Scene Tutorial
coming soon
Advanced – How to Prevent Resin Popping Out
One of the downsides of pouring resin directly into a setting is that it’s prone to falling out. There are a few ways to prevent this. I’ll list them in the blog on KeepsakerSupplies.com which you can find in the video description
- Setting – choose a setting that’s not too shallow, preferably with a curved over top like our hybrid settings
- burr inside if it’s thick walls to create a lip
- scratch the setting to create a key
- first layer clear for best adhesion
- don’t overfill because it’s prone to being knocked out
- don’t mushroom the resin over the lip
- good care instructions, tell clients not to knock, heat changes or chemicals

Other heart tutorials
