Handstamped Bead Washer Tutorial – Making Keepsake Jewellery. In my Basic Silver Soldering Course (coming soon and totally free!) I’m going to teach you the basics of working with solid copper and silver, how to handstamp, how to solder or braze, making basic ring and necklace settings and how to finish your jewellery. Recently I’ve created other free courses to help people learn how to make breastmilk and memorial jewellery – click here to register and take them!
I’m using one of our anti-tarnish solid silver bead washer settings, they’re made from 935 Argentium silver which is 1% purer than sterling silver, read more about it here in my blog on Types of Solid Silver. I also sell a selection of solid silver stamping blanks here if you want to try stamping something else and I’m happy to send you a bit of scrap copper to practice with if you ask nicely 🙂 If you’d like me to anneal a blank please let me know in the comments on the checkout!
Handstamping
I offer handstamping on Tree of Opals for £10 if someone asks but it’s not advertised. It does still make me a little nervous because of some horrible feedback (see below) and knocked my confidence badly. It’s taken me six years to be ready to write this tutorial and that’s only because one of my favourite clients asked for advice on doing it. You’ll find other stamping tutorials on YouTube like these which go into far more detail but I still wanted to write this to include annealing and doming. I don’t think anyone else sells washers like these so this tutorial is unique.
Stamping precious metal is tricky to do, almost impossible to get perfect, so just do your best and make sure you give your clients example photos of your work and brutally realistic expectations if you’re just starting. Handstamping is an inexpensive alternative to laser engraving* and some clients absolutely love the handcrafted look. Some artists are able to get it almost perfect but personally, I love the wonky look!
If you’d prefer all of this ready done for you, please purchase the domed bead washer and add laser engraving (text engraving or image engraving) to the basket and it will be done for you.
935 Silver Handstamped Bead Washer Tutorial Videos
@keepsakersupplies Hand stamped bead washer and annealing tutorial Part 1 #MemorialJewellery #silversmithing #handstamping #antibullying ♬ Long music box music 02-2 (no drive sound) – Icy Light
@keepsakersupplies Hand stamped bead washer and annealing tutorial Part 2 #EuropeanBead #MemorialJewelry #Argentium ♬ Long music box music 02-2 (no drive sound) – Icy Light
You’ll need the following supplies
- a flat bead washer
- soldering block
- flux brush with boric acid and methylated spirits (UK only) or you can use denatured alcohol
- blow torch
- Ultra Fine Sharpie
- letter and number handstamps
- a small hammer
- wooden doming block and punches
- brass or steel doming block with 14 or 15mm and 19mm depressions
- a dust mask or a respirator mask
- some 1500 and 2500 grit sanding pads
- silver polishing stick
- silver polishing cloth
Fire safety please, keep the flux and alcohol or spirits away from any flames at all times. Keep kids and pets away, follow fire safety and check with your insurers before lighting anything, annealing, brazing or soldering. Always keep a fire extinguisher and fire blanket to hand!
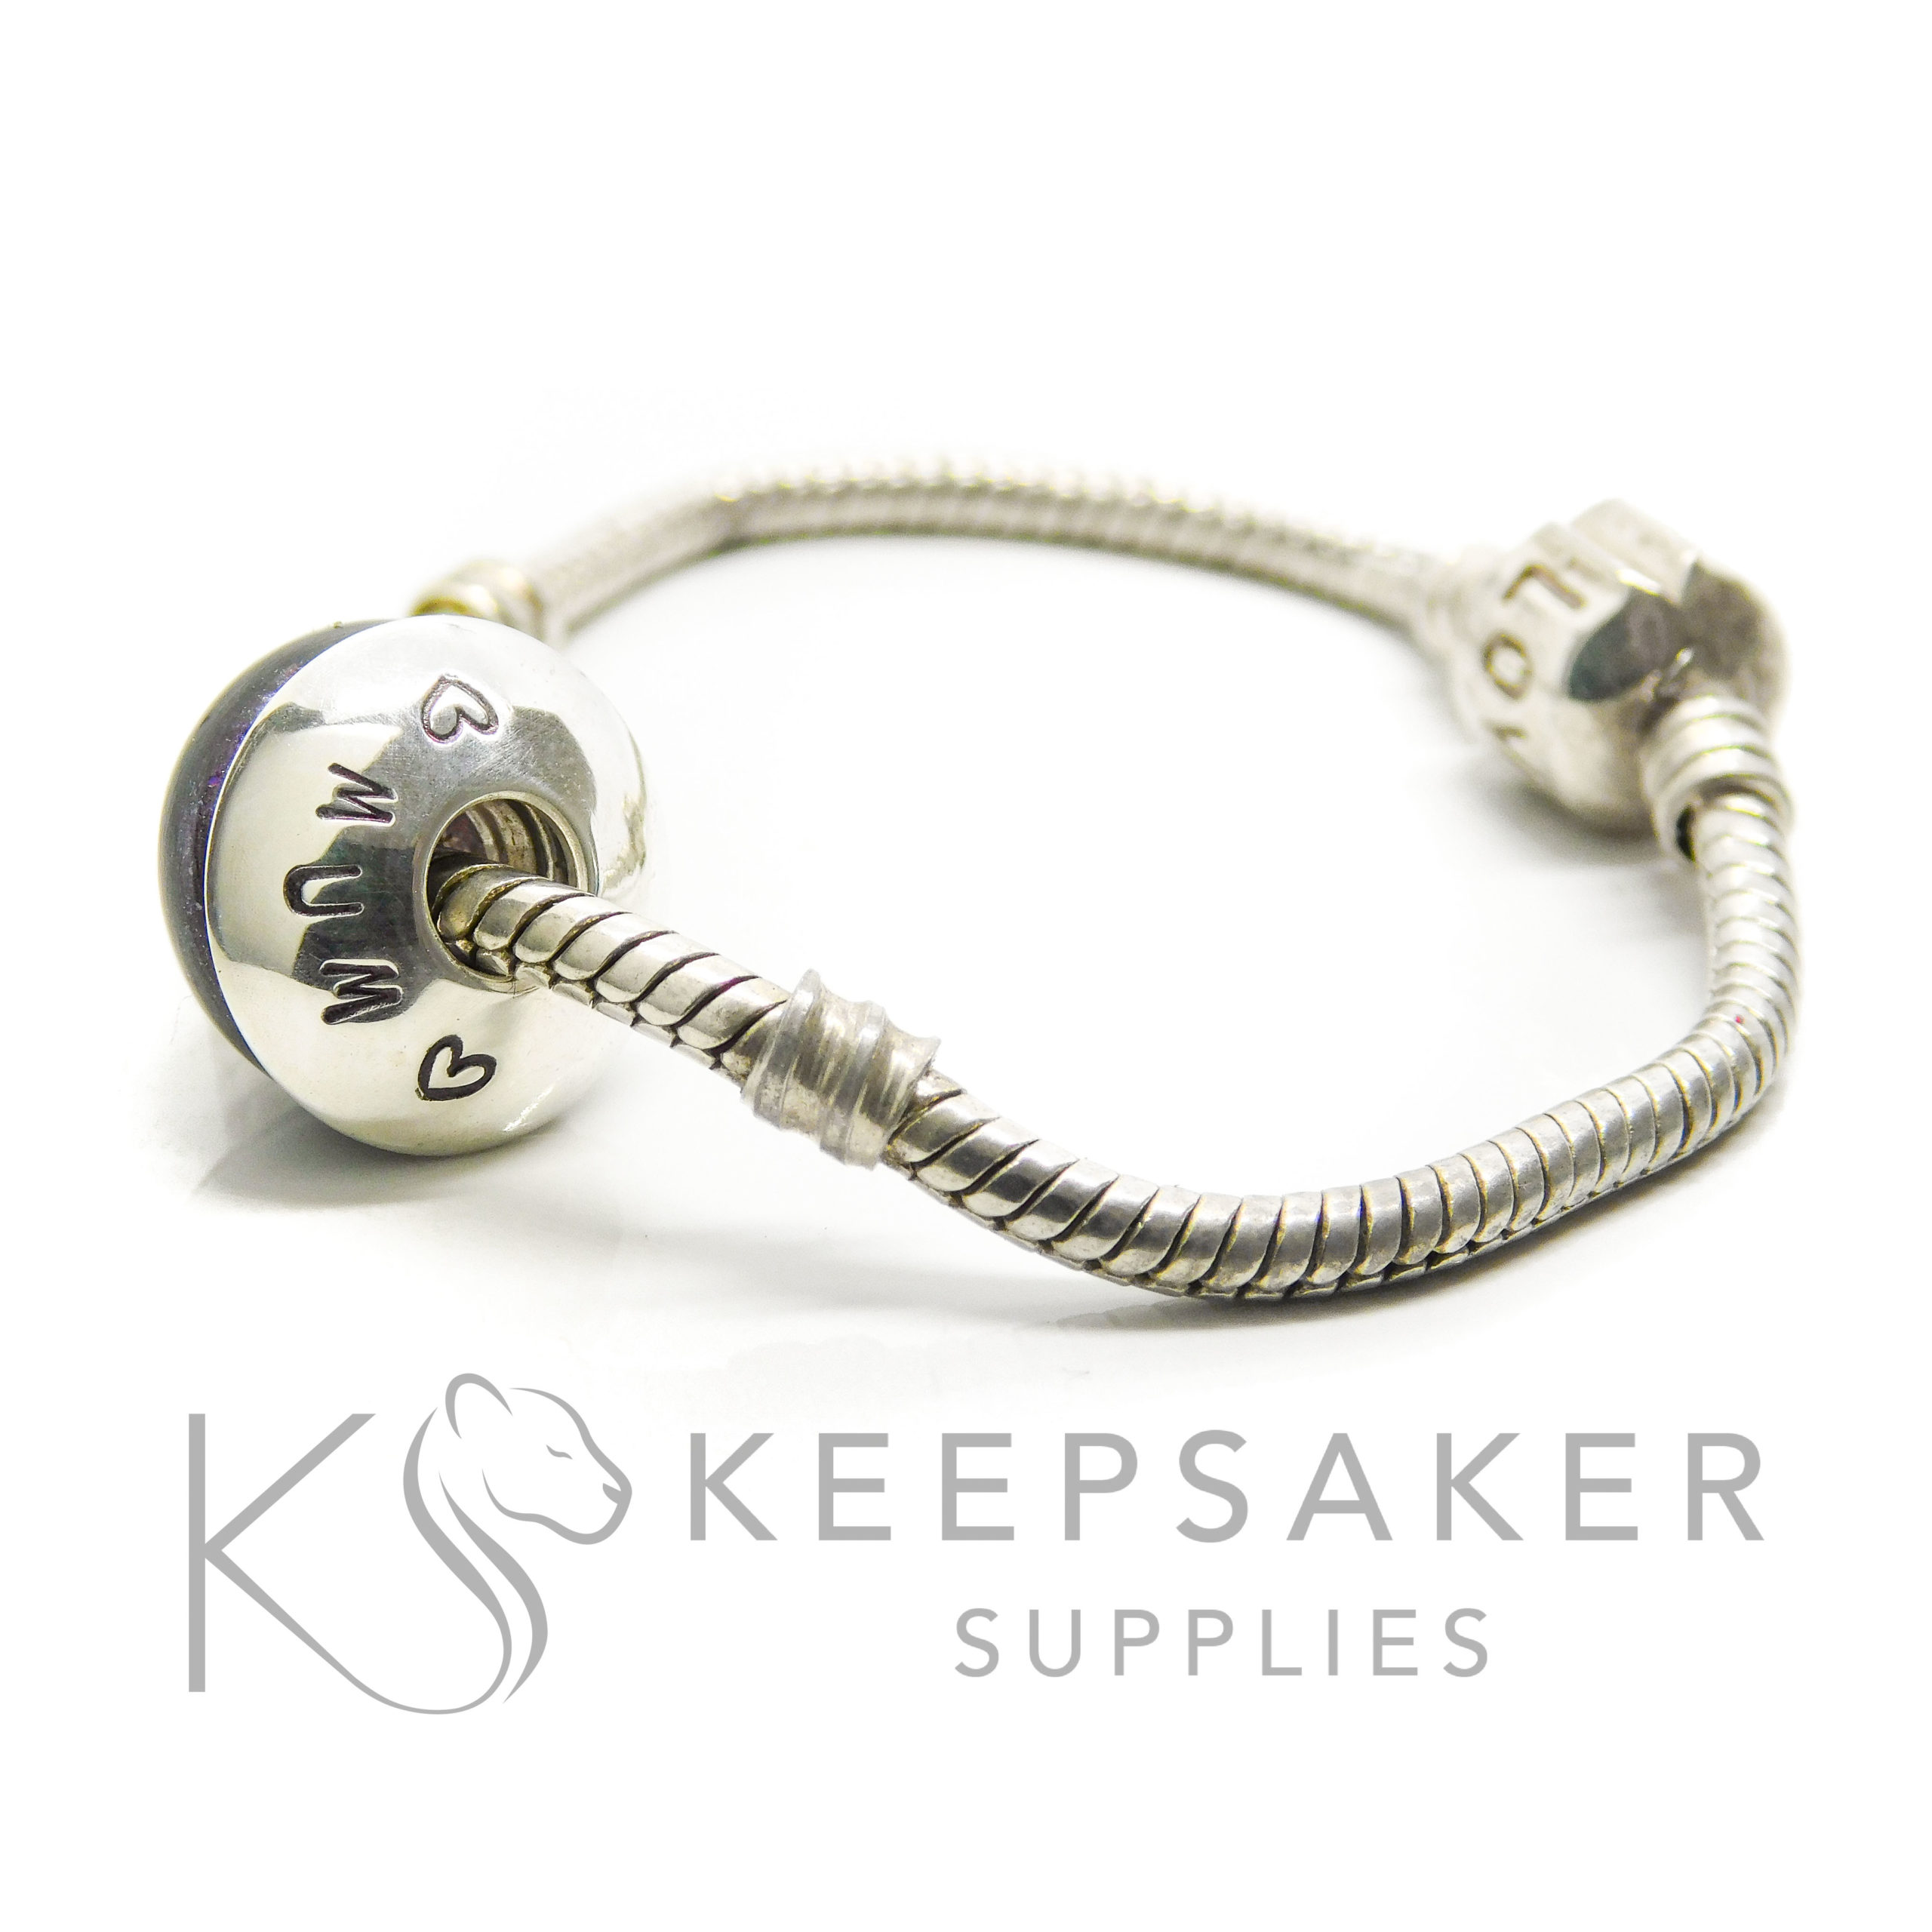
European Bracelet Handstamped Bead Washer Tutorial
Hi, I’m Nikki Kamminga from Keepsaker Supplies and Tree of Opals and today I’m showing you how to handstamp a bead washer with 1.5mm stamps. First we anneal, then stamp the washer before doming until it fits around a European bead nicely. Anneal the washer in between to make it easier to bend and finish with a nice shine.
Fluxing Silver
First I like to protect the silver from firescale by adding flux. You can buy this in little bottles but it’s very inexpensive to make your own in the studio. I mix a couple of teaspoons of boric acid with methylated spirits**. The boric acid dissolves in the alcohol and when you paint it on a piece and light it or allow it to dry, the alcohol goes leaving a coating of the fine white boric acid crystals.*** Flux and using Argentium silver here in this tutorial means I don’t have to pickle my domed washer but you can if you like. More on this in our free silversmithing course.
Annealing Silver
This is the same for most kinds of silver, sterling, Argentium and pure. To make silver easier to bend and less brittle, we can heat it to a point where the colour is cherry red. There are lots of in-depth annealing videos on YouTube so please do a bit of research before you work with a torch for the first time. I use a honeycomb soldering block because other soldering blocks, including a really expensive large one I tried recently, act as a heat sink. Honeycomb ones are much faster. Please place it on something heatproof and get some advice on your soldering setup before you begin.
Quenching and Pickling Silver
After you anneal, you can cool or quench it in cold water. If you’re using Argentium silver, you might find it gets brittle if you overheat or quench it so always try to let it cool down naturally. Especially with more delicate pieces like dainty rings. With this washer, I let it cool a little before cooling in the cold water. If you like, pickle your washer at this point. Because I’m using Argentium 935 silver here and I fluxed it first, I don’t need to pickle as there’s no copper I can see on the surface but if you have a pickle pot there then please do! More on how I pickle in the silversmithing course.
Prepping The Surface
I like to ensure the surface is clean and remove any ridges before stamping with 1500 and 2500 grit sanding pads. You don’t need it shiny but clean and matte is great.
Handstamping Silver
Plan out the letters you’re using first. ALWAYS double check the message to stamp with the client and don’t be afraid to check the spelling, punctuation and grammar. I have had so many clients make typos and other errors in their own stamping and engraving messages**** Write out the characters including emojis and spaces and work out the central letter. That’s where I like to start from, working forwards and backwards. On a straight line you can use stamping guides to get the letters level (absolute game-changer!) but on a curve it’s trickier. Practice lots.
Doming Washers
I like to start with a very gentle curve, that’s using the largest depression in the wooden doming block with the slightly flatter of the two wooden punches. Hit the punch as you see me doing in the first video. The silver is still soft enough now to dome a little before you need to anneal again. Move on to the next smaller depression and hit again to form the washer to the hole. Move down again until you’re at the smallest depression then switch to the more domed of the two punches. Anneal again now, if you like.
Move onto the steel or brass doming block now. You’ll need to start with a depression that’s at least 19mm, but if you have a block with bigger than that, start with those (25mm for example would be great). My largest one was 19mm and the washer just about fits at this point. I have another steel doming block with the largest hole at around 14mm and it’s too small, it doesn’t work, so make sure you get the right one like the one for sale here. If it pops out over the edge, try to get it in before you hit it or you’ll end up with dents along the edges. You shouldn’t need to use a metal doming punch as I aim to get down to about 14 or 15mm and the smaller of the two wooden dapping punches is perfect. It’s got a similar dome to the bead that the washer will sit around! If you dome too much, then the washer will become too small to go round the bead.
Polishing Your Silver
Once you’re happy with the shape of the washer, it fits nicely around the bead etc, you can remove any more scratches with the 1500 grit sandpaper. Then you remove the scratches from that with increasingly finer sandpaper, ideally something like 2400 or 2500 grit. The silver polishing stick is perfect for removing small scratches on the green side and giving a satin finish, then the white side adds shine to the piece. It’s not a perfect mirror finish. Ideally you could then use tripoli and rouge or your preferred polishing compound (I like the green LUXI polish and it’s cruelty-free and vegan) on cotton mops, or some silver paste polishing compounds, but I personally prefer a slight satin finish to my pieces because I think it’s more sustainable. A satin finish from a magnetic tumble polisher hides a multitude of scratches your clients might add, where a mirror finish will show up every single mark. I think the shine from the white side of the silver polishing stick is shiny enough for handmade jewellery but please experiment, research and find what you’re comfortable with.
Thank you for watching my tutorials and please leave a comment on the videos if you found this helpful!
I used to worry about the the correct spelling for hand stamping or handstamping so I looked it up for this tutorial and found it can be either; according to Merriam-Webster, “handstamping” is a valid verb.
“Handstamp.” Merriam-Webster.com Dictionary, Merriam-Webster, https://www.merriam-webster.com/dictionary/handstamp. Accessed 12 Jun. 2023.
*I have tried doming a washer which has been engraved with a graving style machine like the Magic 50, but when I domed it there were scratches which needed to be sanded off before polishing and you could barely read the engraving. The engraver doing them for me wasn’t able to centre them pre-domed so I then found a laser engraver to help me instead.
**I can’t find methylated spirits for sale in the USA, it may be similar to denatured alcohol but it definitely isn’t white spirits or rubbing alcohol (these don’t work too well) – please, if anyone knows an alternative that’s available there let me know.
***Store your flux in a well-labeled airtight container or it will evaporate fast! You can dip your pieces in or paint it on, I love keeping it in a flux brush – a little jar made for basting marinade but a plastic paintbrush is wonderful too.
****One client wrote “man” instead of “Mam“, but the message was something like “man and grandpa“. I assumed the typo was meant to read “Nan and Grandpa” and that’s what I stamped. She left me a 1* review, even though the piece had been free of charge, and shared my photo with another stamper who posted it in a stamping group ridiculing me. This is why I work so hard to create a kind ethos in our Facebook community and am anti-bullying (and why I double and triple check messages). One client wrote “we miss you everyday” and I tactfully suggested that a space between every and day might have a better meaning…
Now relax and do some crafting
