Making Hair Memorial Cufflinks Tutorial with bonus hair bezel keyring and soldering tutorial. Make cufflinks from cufflink findings and round bezel cups ready to be filled with resin or add stones. I have two free courses to help people learn how to make breastmilk and memorial jewellery – click here to register and take them! I have a silversmithing course coming soon so please keep an eye out for it.
Soldering and Making Hair Memorial Cufflinks Video
You’ll need the following supplies
Making the cufflink settings:
- pair of cufflink findings
- two 12mm round bezel cups
- flux liquid this is homemade; please let me know if you want me to cover that in another video
- an old paintbrush to apply the flux liquid
- a small blowtorch and a butane gas canister (I buy at a local hardware shop)
- a honeycomb soldering block
- a pickle pot, I use a small slow cooker with a nylon slotted spoon
- citric acid as natural pickle
- medium solder paste
- third hand tweezers and cross lock
- foam sanding pads
- magnetic tumble polisher – totally optional, a big purchase which makes life 100 times easier
Making the cufflinks with hair stones:
All of our pre-made cufflink settings are available as ashes and fur kits which contain everything but the UV lamp and scissors, but I’m listing the supplies I used below individually for professionals wanting to get the best possible results:
Tools and Equipment
- wooden ring clamp
- SUN3 48w LED UV lamp to work with UV resin
- cocktail sticks
- hairdressing scissors
- diamond file
- sandpaper
- ring clamp
- curved burnisher or a teaspoon
- silver polishing cloth

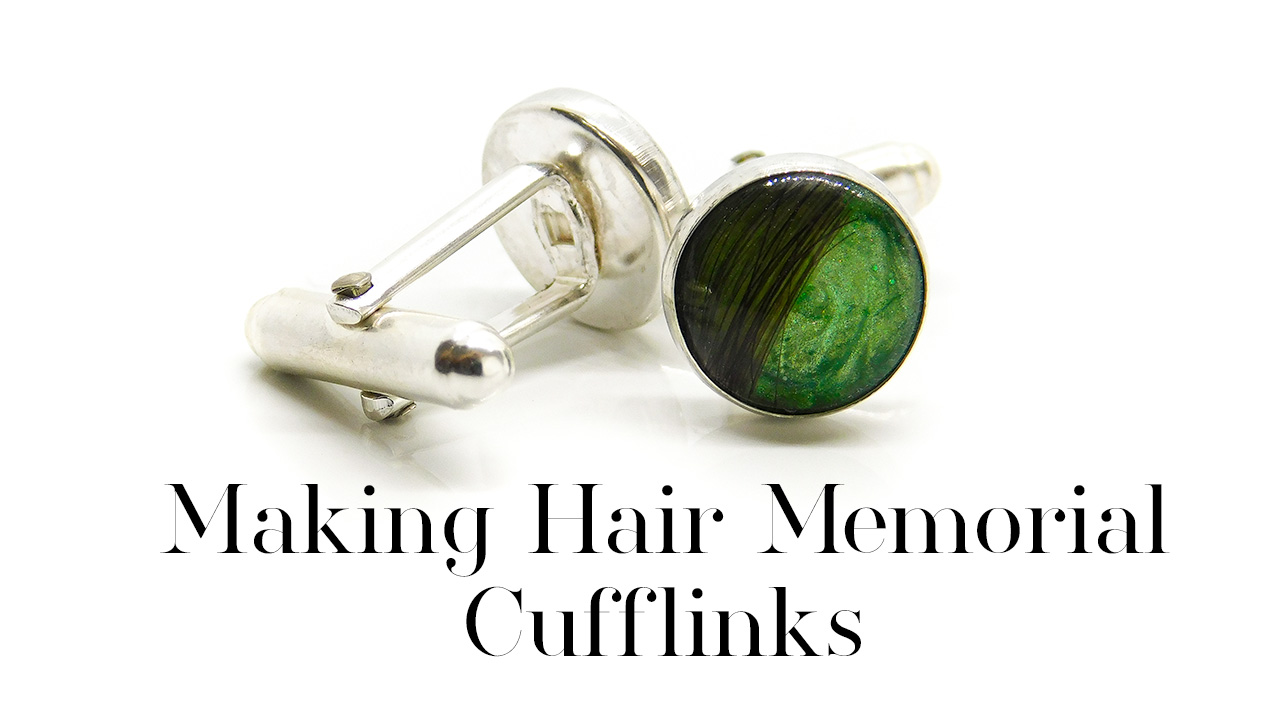
green hair cufflinks and keyring, solid sterling silver handmade cufflinks with lock of hair. Basilisk green resin sparkle mix memorial jewellery with glue-in and rubover bezel setting. Made by hand memento keepsake jewelry
Hi, I’m Nikki Lovegrove from Tree of Opals and Keepsaker Supplies. Today I’m showing you how to make these lock of hair memorial cufflinks and matching keyring from scratch, including soldering the cufflinks. I’ve put links above! You can skip making the cufflinks and buy them from me ready-assembled, but I hope you still enjoy watching me make them
We’re using two cufflink findings here with two 12mm round bezel cups. Add some flux liquid to protect the silver from fire scale. Please let me know if you’d like a tutorial on how I make and use my own. Use the torch or a lighter to burn off the alcohol so you’re left with a coating of boric acid on the silver to protect it from firescale. The trick is getting the pieces perfectly level, then move the finding aside and add some medium solder paste. Put the finding back on without adjusting the height and make sure it’s perfectly centred.
Heat the cufflink from the top, working towards the join, until the silver becomes red (but not orange) and the solder melts. When it’s cooled a bit, use the soldering pick to put it into the cold water to quench it, then put it into the pickle for a few minutes to remove any copper from the surface. In my last tutorial, Soldering A Teardrop Ring, I go into more detail and use the same method. I use citric acid in a small slow cooker and let me know in the comments if you need a bit more advice or would like a video with different inexpensive methods you could use to get started.
Once the colour is a nice silvery white, rinse the settings and dry them off. Use an ultra fine sanding pad to level off the bezel cup, because sometimes they’re a little uneven. I like to finish them in my magnetic tumble polisher which gives me this beautiful sustainable satin finish.
=======
Thank you to my client for her permission to film this anonymously. She posted in this beautiful lock of hair with the sending kit we shipped her. To make a lock of hair stone, put a small amount of the hair on some clear resin on a piece of label backing paper. Don’t use it all up, no matter how much the client’s sent you… That’s very important in case you make a mistake! Today I’m going to make four stones, then send the client a “proof photo” so she can choose her favourite. Add resin all along the hair then use a cocktail stick to soak the hair in the resin and remove air bubbles. I like to wait a little while with hair to allow the air bubbles to rise, then gently push them out
Cut the hair to lengths a little longer than the mould, so they can curve around then carefully transfer the hair to the moulds. Check from the back and you can see where any bubbles are hiding and nudge them back out. Once you’re happy with the hair placement, cure for 99 seconds on a low heat setting, I use a SUN3 UV lamp. Once they’re cured, add a little clear resin to the mould so that the whole of the top layer is coated, but not too much or you won’t have room to add colour. I’ve used Basilisk Green Resin Sparkle Mix, premixed with resin, which comes in opaque black pots. Mix the pigment into some clear resin behind the hair in a swirl then cure again. Repeat, using slightly more pigment in each layer until it’s almost full. The last layer should be clear, as it’s easier to sand flat that way. Don’t use too much pigment or you’ll find the layer won’t cure properly
I also like to cure the offcuts of hair and return these to the client. If you’re enjoying this video please consider subscribing to my channel or following me. Wait until the stones are completely cool then remove them from the mould and give them a good check. Number the stones on the back and put them on something you can photograph for your client. Send your client a proof photo to see which one they prefer. I took one in the studio and one in natural light. Always let your clients know that the spare stones will be returned to them, along with the leftover hair, free of charge. My client chose stones 1 & 2, and I’m making her a little gift with stone 3 to show you why I don’t usually use stones in this kind of setting.
Take their chosen stone and trim the edges and file the excess. Check it in the bezel setting and, if necessary, use some coarse sandpaper to level out the back. If the stone is too tall, sand it down. I’m gluing this stone into the setting, to show you why I don’t normally advise this. If you need to use this method, make sure you score the setting with a file. Add some glue or clear resin then add the stone. You can see the resin has seeped up the edge and made air bubbles, which can be tricky to remove. I do my best but you can still see them on the finished piece. Cure and pack away any spare stones to return to the client.
To set the cufflinks, remove any excess resin from the edges of the stones and file the edges neatly, then sand the backs level. Place one of the cufflinks in a wooden ring clamp and secure, then check the stone inside the setting. I find these more tricky to set than rings. Use a curved burnisher to press in the edges at 12o’clock, 6o’clock, 3o’clock then 9o’clock, then the corners, then smooth down any ridges. I use the back of the burnisher towards the end for a better seal. You want the stone to be well-secured and not be able to move. Repeat the process with the other cufflink and you have a pair. Give them a final polish with a silver polishing cloth and photograph. To add a large split ring to a pendant to make a keyring, use your fingernail or tweezers to open it and slide the loop on.
I’m so grateful for my client’s permission to film this Tree of Opals order being made. When you buy memorial jewellery or the supplies to make it yourself from me, you’re supporting a single mum. I work really hard to make my websites professional but I work part time with one part time employee so you really are supporting a small business!
Thanks for watching. Now relax and do some crafting

Please note, this blog contains affiliate links, meaning I receive a small income based on your purchases from Amazon and Etsy etc. This affiliate income is really helpful to me to support my family and if you’d like to know how I set it all up please get in touch (blogs coming soon!).
Nikki
TikTok videos
